This article describes how a goPost user can create a project application.
Prerequisites:
From the Dashboard, select 'DOCUMENT SUBMITTAL RECOMMENDATIONS' and read the documentation before preparing your plan review documents in PDF format.
See Getting Started
In this article:
Step 1: Complete the 'INFORMATION' page.
- Choose the appropriate Project Type from the drop down.
- Depending on how goPost has been configured, projects may be submitted for Permitting projects and/or for Design Review (non-permitting) projects.
- Fill out the form completely.
- Select the SAVE button.
At this point, your project is CREATED and you can leave and return to continue or complete the application at any time.

Step 2: Complete the 'CONTACTS' page
Each project must have at least one Project Contact. The Primary Contact person must be a user with an account to login to goPost since they are expected to access the project to upload submitted files, receive email notifications, download deliverable packages, etc. Additional contacts may be added for informational purposes, but these other users cannot access and edit the project.
To add a project contact:
- Select the + button at the bottom right of the Contacts page to open the ADD/EDIT CONTACT form, shown below.
- Either manually fill in the required information or click on the 'Fill with my Information'checkbox to autofill this form with your user information.
- Choose a Role from the drop down that reflects the contact's association to this project.
- If you are creating this contact role on behalf of another user and wish to give them upload, editing, and email notification rights for this project, click the 'Grant Rights' checkbox at the top.
- Once all required information is filled out, click SAVE.
- Complete a Contact form for other individuals as 'Primary Contacts', as desired.

Fields denoted with an asterisk are required.
Step 3: Upload your first set of plan review documents and supporting attachments
Prerequisites:
See Preparing your Documents - SUBMITTAL RECOMMENDATIONS
From the DOCUMENTS tab, select the add button on the bottom right corner of the page.
- Upload your plans in PDF format and supporting attachments (any file format).
- After the page refreshes:
- Verify that the plan review files in PDF format are placed on the left side of the page.
- Click the right arrow to move supporting documents in PDF format to the right side of the page under ATTACHMENTS (see below).
- Verify that the plan review files in PDF format are placed on the left side of the page.
- Select the PROCESS button to inspect the Plan Review files for compliance.
- Plans that do not pass inspection should be deleted from the documents page.
- See Preparing your Documents - SUBMITTAL RECOMMENDATIONS for instructions on resolving file issues.

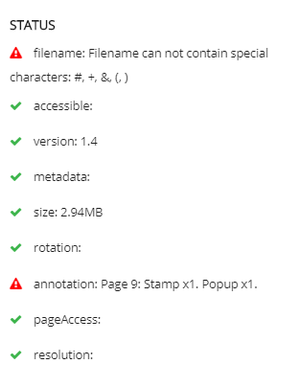
Documents that do not pass the inspection process will be flagged with a red warning symbol.
Click on the symbol to open the STATUS window as shown in the example below.
Delete the rejected documents, resolve the issues and reupload the document again for another inspection.
Step 4: Submitting your project
Once all plan review documents have been inspected and flagged with a green checkmark status, select the FINISH button to complete the upload process.

Then, select the SUBMIT button at the top of the page to trigger a notification the Intake staff.
Once the Intake staff begin their completeness check on your project you will not be able to make changes to the information/documents submitted.
About the Intake Completeness Check Process
After submitting your project, you will receive an email when:
- Your project has been accepted. In this case, await an email notification that a deliverable package is available for download from goPost.
- If the reviewed plans require corrections:
- Make those corrections to your drawings and upload new PDF's as the 'next version'.
- Submit those plans to Intake staff again.
- If no changes are required to your most recent document submittal, no further action is required.
- Depending on the Agency/plan review Firm rules, your approved plans will be made available for download via goPost or you may be given other instructions.
- If the reviewed plans require corrections:
- Your project has been placed on hold for 'file issues':
- Make the requested changes to your submitted plans per the instructions in the email.
- Upload the corrected documents to the project and Submit to intake again.
- Your project has been placed on hold for other issues:
- Provide the information requested in the email and 'Submit' the project to Intake staff again.
- Your project has been denied. In this case, the Intake staff have refused your project application outright. The email you receive will provide more details.
Related articles