This article describes how a goPost Applicants will use the goPost™ Public Portal (goPost) user can create a project applicationto create, submit, and track project applications with the approving agency.
Prerequisites:
From the Dashboard, select 'DOCUMENT SUBMITTAL RECOMMENDATIONS' and read the documentation before preparing your plan review documents in PDF format.
See Getting Started
In this article:
| Table of Contents |
|---|
Step 1: Complete the 'INFORMATION' page.
...
Choose the appropriate Project Type from the drop-down.
Depending on how goPost has been configured, the list may include project types for Permitting and/or for Design Review (non-permitting) projects.
...
Fill out all required field (marked with an asterisk *).
For Property Location, selection one of the following:
...
After creating an Applicant account from the goPost login screen, you will be directed to the goPost Dashboard Page.
Read the “Document Submittal Recommendations.”
Watch the “Creating an Application in goPost and What to Expect” video.
| Table of Contents |
|---|
...
Dashboard
The Dashboard displays the instructions for how to submit files at the top of the page and displays your pending and recent projects:
To view detailed submittal instructions, click on DOCUMENT SUBMITTAL RECOMMENDATIONS underneath the Dashboard Instructions.
Any project applications that have a status of Pending or Pending Link will display within the “Pending Projects” table until their status is updated.
Any project applications updated within the past 90 days will be displayed in the “Recent Projects” table, regardless of their status. After 90 days, they will no longer display here but will continue to be available from the Projects Page.
Begin a new project application by clicking the ![]() button in the lower right corner of the Dashboard Page.
button in the lower right corner of the Dashboard Page.
| Info |
|---|
New project applications can be created by clicking the |
...
Step 1: Fill in the required fields within the “INFORMATION” tab
If given the option, select whether your project application is a new application or a revision of an existing project. If no option is presented, the assumption is this is a new application.
When submitting an application for a new project, select No, this is a new project. When resubmitting per the agency’s request, continue to use the same application and do not change the selection.
If you’ve already received approval for your application and have further changes, you may need to instead select Yes, this project is a revision of another project. Consult with agency staff for guidance.
Under “DETAILS”, fill out any fields marked with an asterisk ( * ) at a minimum as these are required. Supply any additional details as desired.
Select the Project Type appropriate to your project application.
Under “PROPERTY LOCATION”, fill out any fields marked with an asterisk ( * ) at a minimum as these are required. Supply any additional details as desired.
For a specific address fill in Street #, Direction, Street Name, Street Type, Unit/Suite, City, State/Province, Zip/Postal Code, and Country as appropriate.
For sites without a street address, you may instead provide a Parcel # or Tract # if those fields are available.
For sites at intersections, along a stretch of road, or that otherwise are not covered by the previous options, you may be able to check the box for "This property does not have a street address" (if available).
Select Under “ADDITIONAL INFORMATION”, fill out any fields marked with an asterisk ( * ) at a minimum as these are required. Supply any additional details as desired.
If no additional information is required, this sub-tab may be empty.
Click the SAVEbutton.
| Info |
|---|
At this point, your project is CREATED and you can leave and return to continue or complete the application at any time. |
...
Step 2:
...
Provide Contact Information
Each project must have at least one Project one Project Contact. The Project Contact person must be a user with an account to log into goPost a valid login since they are expected to access the project to upload submitted files, receive email notifications, download deliverable deliverables packages, etcand more. Additional contacts may be added for informational purposesreference. If these other contacts also have applicant accounts to log in to goPosta valid login, they will also have project access; if not, they will only be used as a reference information.
To add a contact:
Select the +
 button at the bottom right of the Contacts page.
A form will pop up asking you to either:
Add Self
Add New User
Add Existing UserAdd Self
Select the appropriate option and click NEXT.
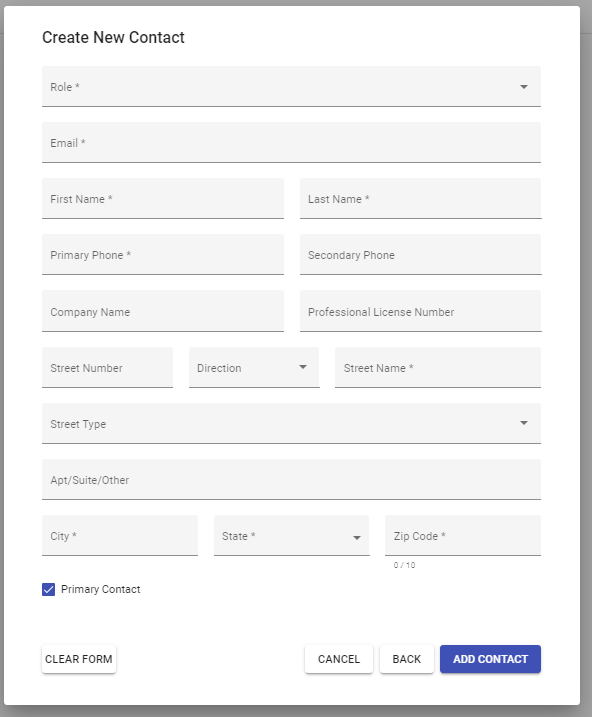
If you are adding a New User new user that is not in goPost:
Choose a Role from the drop-down that reflects the contact's relationship to the project.
Fill in all required information (fields with an asterisk *).
Click ADD CONTACT.
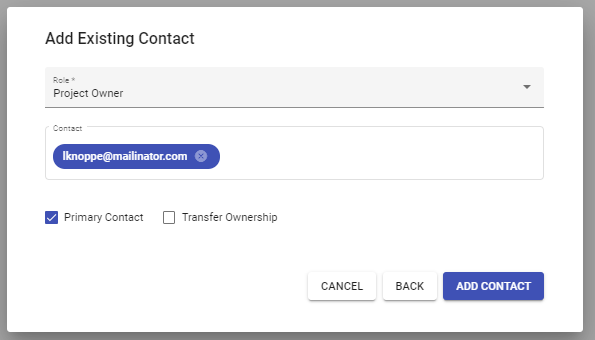
If you are adding an Existing User existing user that is already in goPost:
Choose a Role from the drop-down listthat reflects the contact's relationship to the project.
Type in the user's full email address in the search field. goPost will return a match if it already exists. Click on the match so the user is selected (email turns blue).
Click ADD CONTACT.
If no match is returned, check the email address entered. If correct, click BACK. The contact may not already exist and you’ll need to add them as a new contact.
If you are adding yourself (Self):
Choose a Role from the drop-down list.
Click ADD CONTACT.
Repeat as needed.
...

...
| Note |
|---|
Fields denoted with an asterisk are required. |
...
Step 3: Upload
...
Prerequisites:
...
Documents
Before uploading any documents, read the “Document Submittal Recommendations” and review Preparing your Documents - SUBMITTAL RECOMMENDATIONS.
Upload any files that require plan review under the PLANS section and any supporting documents that do not require plan review under the ATTACHMENTS section. Files uploaded as PLANS must be in PDF format while supporting documents uploaded as ATTACHMENTS can be any file type.
From the
...
“DOCUMENTS” tab, select the
...
Upload New Document button
...
in the bottom right corner of the page.
Upload your plans in PDF format and supporting attachments (any file format).
After the page refreshes:
Verify that the plan review files in PDF format are placed on the left side of the page.
Click the arrows underneath the 'Actions' header to move supporting documents in PDF format to the right side of the page under ATTACHMENTS (see below).
Select the PROCESS button to inspect the Plan Review files for complianceSelect documents:
Click Browse Files and search your computer or network for files to upload.
OR drag and drop files into the highlighted section. If files are dropped outside of the highlighted section, your web browser may open the file and display it.
Ensure only files that require plan review are listed under the PLANS section. Files clearly provided for reference such as a submittal application should be listed under the ATTACHMENTS section
Move files between PLANS and ATTACHMENTS as needed by clicking the Move button under “Actions”.
Non-PDF files are automatically listed under ATTACHMENTS and cannot be moved.
Review the PDF Scout™ results provided for any files uploaded to the PLANS section. ATTACHMENTS do not undergo inspection.
Plans that do not pass inspection should be deleted from the documents page.will not be accepted for plan review. See Preparing your Documents - SUBMITTAL RECOMMENDATIONS for instructions on resolving file issues.
...
.
Delete any files that fail inspection, then modify and upload corrected files.
Select the Process button to finish uploading files.
...
| Warning |
|---|
Documents that do not pass the inspection process will be flagged with a red |
...
symbol. |
...
Click on the symbol to open the STATUS window as shown in the example below.
...
...
Step 4:
...
Once all plan review documents have been inspected and flagged with a green checkmark status, select the PROCESS button to complete the upload process.
...
Submit Your Project Application
Once you have uploaded your documents, click the Submit button at the top of the page to trigger a notification the Intake staff.
...
to submit your project application to your agency.
...
| Info |
|---|
Once the Intake agency staff begin their completeness check on your project application, you will not be able to make changes to the information/documents submitted. |
...
Post-Submittal
After submitting your project application, you will receive an email when:
...
Your project has been accepted. In this case, await an email notification that a deliverable package is available for download from goPost.
If the reviewed plans require corrections:
Make those corrections to your drawings and upload new PDF's as the 'next version'.
Submit those plans to Intake staff again.
If no changes are required to your most recent document submittal, no further action is required.
Depending on the Agency/plan review Firm rules, your approved plans will be made available for download via goPost or you may be given other instructions.
...
Your project has been placed on hold for 'file issues':
Make the requested changes to your submitted plans per the instructions in the email.
Upload the corrected documents to the project and Submit to intake again.
...
Your project has been placed on hold for other issues:
Provide the information requested in the email and 'Submit' the project to Intake staff again.
...
the agency will review the application to follow up with payment instructions, provide feedback regarding any submittal deficiencies, or they will accept the project application for plan review as described in Tracking Your Projects.
Related articles
| Filter by label (Content by label) | |||
|---|---|---|---|
|
...
|
| Page Properties | ||
|---|---|---|
| ||
|
...